3D Animation - Lip Sync
UV Mapping and Texturing - The Bathysphere
Creating the map was simple enough by using Spherical Mapping. When I had finished creating the texture, I just moved the seem to the back of the model where it wouldn't be visible.
To create the texture for the exterior I mixed layers of paint strokes and textures with coloured overlays to obtain the exact look I wanted for the bathysphere. I also altered the material attributes to make the object look more metallic.To hide the seem, I decided to create a band with decorative rivets. I created a texture that was a close match to the shade of the porthole frame. I even experimented with bump mapping on this band, to make it appear slightly rusted.
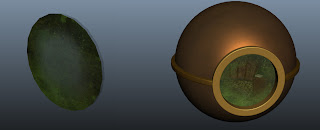
To complete the bathysphere, I modelled a glass pane. I wanted to paint a grubby, worn-looking texture for the outside of the window to give the impression that the bathysphere has been underwater for quite a long time. As though algae has started to grow on its surface. On the inside section, I erased most of this texture, apart from a little "dust" at the edges where it hasn't been "cleaned".

UV Mapping - Part 2
I decided I wanted to create all of the textures for my control panel as it's one of the main focal points in my scene. This screencap shows all of the components with the checker material applied and fully mapped. For the components that have been duplicated I used the same map.
The map for the control box itself.
Maps for a pipe and the pressure dials.
Concept Art - Colour Palette
Before starting texturing, I worked on another concept piece to decide on final colour palettes and some initial lighting ideas.
UV Mapping - Part 1
The Next Step was to start UV mapping all the models that I wanted to create textures for. I started with one of the most simple objects to get used to the process. Applying a checkered material, selecting the right faces and creating the appropriate maps. Then using the UV Texture Editor to unwrap the maps and arrange them in the best way for creating my textures.
In the case of this journal, I found that sometimes the map needs altering if the texture doesn't 'fit' the object properly.
In the case of this journal, I found that sometimes the map needs altering if the texture doesn't 'fit' the object properly.
To create my textures, I use Photoshop to layer images of textures, colour screens and digital brush strokes. For example with the book's cover, I sourced a leather texture and then applied a coloured overlay layer to it.
Modelling - The Bathysphere
Obviously, creating this model was my starting point. However, over the course of this project the model for the bathysphere has been altered a few times. This is the latest version of the model, which includes the floor, skirting board, dado rail and an exterior border. I used to bridge tool to create the interior details.
I like to think it reflects the style of the bathyspheres and submarines I looked at for inspiration at the start of the project. But what I also wanted, was to make sure this model did have some unique qualities that would make my scene stand out.
I like to think it reflects the style of the bathyspheres and submarines I looked at for inspiration at the start of the project. But what I also wanted, was to make sure this model did have some unique qualities that would make my scene stand out.
Modelling - Photo Frames
As my environment is developing a more 'homely' look, I wanted to include some picture frames to be put on the walls and on the desk. These were simple enough to create using cubes and cylinders, extruding select faces and also creating glass panes.
Modelling - The Chair
From the sketch in my concept drawings, I created this chair model. I used to 'create polygon tool' to sculpt the curved legs which I thought would give the space a more Edwardian look.
Modelling - The Journal
I decided to create a simple model of a small book that would be Norman's journal, to be placed on the desk.
LIP SYNC - First Draft
The first shot at lip syncing, where I've animated the mouth shapes and a little jaw movement. Just need to animate those eyes now.
Modelling - Wall Lamp
Wall Lamp:
I modelled my wall lamp in an antique style to fit with the 'homeliness' of my interior. I hope to get a nice contrast of warm lamp light with the cold blue light from the porthole.
Animatic - Preparation
For the next draft of my story board and animatic I took screenshots from my modelled environment to test out my camera angles. This helps with my understanding of where the props are arranged and the very basic positions of my character.
For my next draft of the storyboard I will use these frames as a basis for the new ones, and then draw Norman's poses over the top.
For my next draft of the storyboard I will use these frames as a basis for the new ones, and then draw Norman's poses over the top.
Modelling - Desk
Writing Desk:
I sourced a reference of an antique desk that I thought fit the visual style of my scene, and I used this image as a basis for my sketches. I then modelled my desk in a similar style. Next I will go back to my sketches to think about possibly adding some more objects on and around the desk - such as the journal.
Modelling - Control Panel
Control Panel:
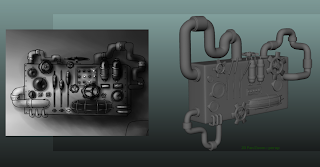
Here I show how I used my concept sketch to create the model for the control panel. Though there are a few differences, I found the simplest method was to model each component and then to position them around the box.
More concepts!
Sound Design - 12th October
http://www.youtube.com/watch?v=ZcLpNP8jwRo
http://www.youtube.com/watch?v=UIUzgUM8CZs
http://www.youtube.com/watch?v=CnTGX9GlFPE
Floor Plan
This is a very basic floor plan to show to the main components of my set. I kept my camera angles in mind when positioning the 'furniture' because I knew the entrance side of the room isn't visible in the scene, which is why that area of the bathysphere is clear.
Environment Sketches
My first sketches of my layout. I have been playing with angles and lighting rather than dwelling too much on the intricate details.
The next step I will take is making a floorplan, as I now have a good sense of what I want to show in the scene. After that I want to experiment with more colour palettes and lighting, and also looking at how I can make my environment more stylised.
The next step I will take is making a floorplan, as I now have a good sense of what I want to show in the scene. After that I want to experiment with more colour palettes and lighting, and also looking at how I can make my environment more stylised.
Storyboard - Roughest Draft
I found the easiest way to think of a short narrative was to roughly sketch it out on paper first. The main aspect I had to keep in mind was there had to be a change in character emotion. So I decided that Norman would have been stuck in the bathysphere for quite a while, not having witnessed much. I wanted him to see something through the porthole that would suddenly strike him with interested and amazement.
So my emotional change to try to convey would be BOREDOM > BEWILDERMENT
Whilst sketching the draft out, I thought about how I wanted to show my environment from a range of angles. This would mean being able to show my layout to it's fullest, and to make my scene more dynamic.
So my emotional change to try to convey would be BOREDOM > BEWILDERMENT
Whilst sketching the draft out, I thought about how I wanted to show my environment from a range of angles. This would mean being able to show my layout to it's fullest, and to make my scene more dynamic.
Voice Clip for Lip Syncing
The next step for my scene was to find a voice clip. After listening to all kinds of lines, I chose this one from "2001: A Space Odyssey".
It's puzzling
"It's puzzling. I don't think I've ever seen anything quite like this before."
It seemed like a versatile line, and I wanted that so that I had more freedom when it came to planning my story. The line also seems to fit quite well with the awe and mystery of my deep-sea location.
It's puzzling
"It's puzzling. I don't think I've ever seen anything quite like this before."
It seemed like a versatile line, and I wanted that so that I had more freedom when it came to planning my story. The line also seems to fit quite well with the awe and mystery of my deep-sea location.
Initial Ideas for my Scene
As part of my plan for my scene in the "Norman on the Road" project, the very first thing I wanted to decide on was which sort of enviornment I would choose. Layout is something I'm quite interested in, and I really want this to be an effective aspect of my scene.
"Bathysphere" popped into my head as ideas sometimes do. I thought it was quite a unique setting, and something I could really play with the visual styles of. I've got my visual inspiration from Jules Verne's "20,000 Leagues Under the Sea" (and it's movie adaptation), the "BioShock" video game series, and other imagery of submarine interiors.
Above are some of the images I have gathered for visual inspiration.
Subscribe to:
Comments (Atom)


